As an admin, you walk a fine line between making sure that your Salesforce org is secure and that your users can log in quickly and easily. The most effective way to protect your org and its data is to require that users provide more than just their username and password. Security experts call this multi-factor authentication, or MFA for short.
To complete the tasks in this unit, you need a mobile device running either Android or iOS.
What Is Multi-Factor Authentication?
By the way, you may be more familiar with the terms two-factor authentication or 2FA. Not to worry! While 2FA is a subset of MFA, we’re effectively talking about the same thing.
So, what exactly are the multiple factors? They’re different types of evidence that users provide when logging in to confirm their identity.
- One factor is something users know. For Salesforce logins, that’s a username and password combination.
- Other factors are verification methods that a user has in their possession, such as a mobile device with an authenticator app installed or a physical security key.

You might not have known what it’s called, but you’ve probably already used multi-factor authentication. Every time you get cash from the ATM, you use something you have (your bank card) plus something you know (your PIN).
Requiring another factor in addition to a username and password adds an extra, important layer of security for your org. Even if a user’s password is stolen, the odds are very low that an attacker can guess or impersonate a factor that a user physically possesses.
How Multi-Factor Authentication Works
MFA adds an extra step to your Salesforce login process.
- A user enters their username and password, as usual.
- Then the user is prompted to provide one of the verification methods that Salesforce supports.
You can allow any or all of these verification methods:
|
Salesforce Authenticator |
A free mobile app that integrates seamlessly into your login process. Users can quickly verify their identity via push notifications. We’ll talk more about this app in a bit. |
|
Third-party TOTP authenticator apps |
Apps that generate unique, temporary verification codes that users type in when prompted. This code is sometimes called a time-based one-time password, or TOTP for short. Users can pick from a wide variety of options, including Google Authenticator, Microsoft Authenticator, or Authy. |
|
Security keys |
Small physical tokens that look like a thumb drive. Logging in with this option is fast and easy — users simply connect the key to their computer then press the key’s button to verify their identity. Users can use any key that’s compatible with the FIDO Universal Second Factor (U2F) standard, such as Yubico’s YubiKey or Google’s Titan Security Key. |
When Are Users Prompted for Multi-Factor Authentication?
To step up security even more, you can add an MFA requirement for additional circumstances:
- When users access a connected app, dashboard, or report. This process is known as step-up or high-assurance authentication.
- During a custom login flow or within a custom app, for example, before reading a license agreement.
Step 1: Verify that the session security level is set for multi-factor authentication
First, let’s make sure that the right security level is associated with the multi-factor authentication login method. In most production orgs, this setting is already in place. But if it’s not, it’s important to do this step before you set up an MFA requirement for any admin users. Otherwise, you could prevent yourself or other admins from logging in.
- From Setup, enter Session Settings in the Quick Find box, then select Session Settings.
- Under Session Security Levels, make sure that Multi-Factor Authentication is in the High Assurance category.
Step 2: Create a user
- From Setup, enter Users in the Quick Find box, then select Users.
- Click New User.
- For the first name and last name, enter Sia and Thripio, respectively.
- Enter your email address in the Email field. This setting is to get user notifications for Sia.
- Create a username for Sia and enter it in the Username field. It must be in email address format, but it doesn’t have to be a working email address. Make sure the email address is unique in your Trailhead Playground. We’re going to use Sia’s first initial, last name, and current date in the username like this: [email protected].
- Edit or accept the nickname value.
- For User License, select Salesforce Platform.
- For Profile, select Standard Platform User. While you’re here, deselect the options to receive Salesforce CRM content alerts. No need to clutter your inbox with unnecessary email from Salesforce.
- Make sure that Generate new password and notify user immediately is selected—it’s way down at the bottom of the page. Salesforce emails you about Sia’s new user because you entered your email address in the Email field.
- Click Save. Salesforce emails you a link to verify the user and set Sia’s password.
Note: If you get an error that the username exists, create a user with a different name. - Log in as Sia, and reset the password.
After you set the password, it’s time to enable MFA for Sia’s user account.
Step 3: Create a permission set for multi-factor authentication
Enable MFA for users by assigning the Multi-Factor Authentication for User Interface Logins user permission. You can do this step by editing profiles or by creating a permission set that you assign to specific users.
A permission set is a collection of settings and permissions that gives users access to various Salesforce features. Let’s create a permission set with the MFA permission.
- If you’re logged in as Sia, log out. Log in again as the system administrator of your Trailhead Playground.
- From Setup, enter Permission in the Quick Find box, then select Permission Sets.
- Click New.
- Label the permission set “MFA Authorization for User Logins”.
- Click Save.
- Under System, click System Permissions.
 Now you’re on the detail page for the MFA Authorization for User Logins permission set.
 - Click Edit.
- Select Multi-Factor Authentication for User Interface Logins.

- Click Save, then click Save again to confirm permission changes.
You’re almost there! You just need to assign the permission set.
Step 4: Assign the permission set to Sia’s user
For now, we’ll assign the permission set just to Sia. Later, when you’re ready to roll out MFA more broadly, you can assign the same permission set to other users.
If you’re not on the detail page for your new permission set, navigate back there.
- On the detail page of the new permission set, click Manage Assignments.
- Click Add Assignments. On the list of users, select the checkbox next to Sia’s user. (If you wanted, you could assign up to 1,000 users at a time.)
- Click Assign.
Great! You’ve turned on multi-factor authentication for Sia. The next time Sia logs in, she’s prompted to provide a verification method as a second factor, in addition to her username and password.
How does Sia set up a verification method? Let’s look at that next.
How Users Register Salesforce Authenticator for MFA Logins
Like making an unannounced visit to a city in the clouds, it’s a bad idea to require multi-factor authentication without helping your users get at least one verification method. You probably won’t get frozen and taken prisoner, but you might get lots of calls when you least want them, like when you’re watching an epic motion picture. Fortunately, Salesforce makes it easy for you to help your users. Just have them download an authenticator app onto their mobile device and connect it to their Salesforce account.
If users don’t download an app right away, it’s not a disaster. They’re prompted to register a verification method when they log in for the first time after you turn on the MFA requirement.
Sia Thripio, our new employee, wants to use the Salesforce Authenticator mobile app so she can take advantage of the cool push notification feature for fast authentication. Let’s see how the registration and login process works. Get your Android or iOS mobile device and pretend it’s Sia’s phone. You’re going to download the Salesforce Authenticator app and connect it to Sia’s Salesforce account.
Heads up that you’ll be jumping back and forth between two devices in the following steps. When you’re on your PHONE, you’re working as Sia in the Salesforce Authenticator app. When you’re on your DESKTOP, you’re logged in as Sia in your Trailhead Playground in a web browser.
- PHONE: Download and install Salesforce Authenticator for iOS from the App Store or Salesforce Authenticator for Android from Google Play.
- Tap the app icon to open Salesforce Authenticator.
- DESKTOP: If you’re still logged in to your Trailhead Playground as a system administrator, log out.
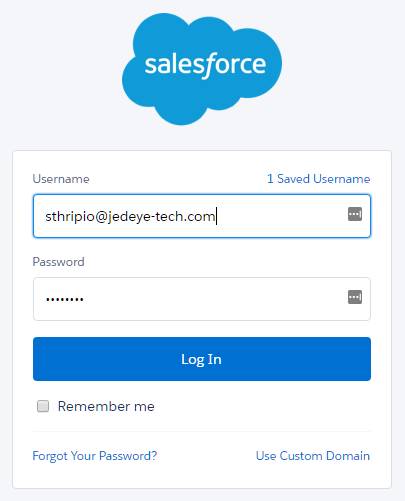
- DESKTOP: Use Sia’s username and password to log in.
- DESKTOP: Salesforce prompts you to connect Salesforce Authenticator to Sia’s account.
- PHONE: Page through the tour to learn how Salesforce Authenticator works.
- PHONE: Enter Sia’s (your) mobile number to create a backup of the accounts that are connected to Salesforce Authenticator. Then tap the notification when prompted to complete the verification. You can skip creating a passcode for now. (Later on, Sia can create a passcode if she wants to set up a backup to restore her accounts.)
- Tap the arrow to add Sia’s account to Salesforce Authenticator. The app displays a two-word phrase. (Hey, did you get an especially poetic or amusing phrase? Let us know! #Trailhead #AwesomePhrase #SalesforceAuthenticator.)
- DESKTOP: Enter the phrase in the Two-Word Phrase field.

- DESKTOP: Click Connect.
- PHONE: Salesforce Authenticator shows details about Sia’s account: her username and the name of the service provider—in this case, Salesforce.
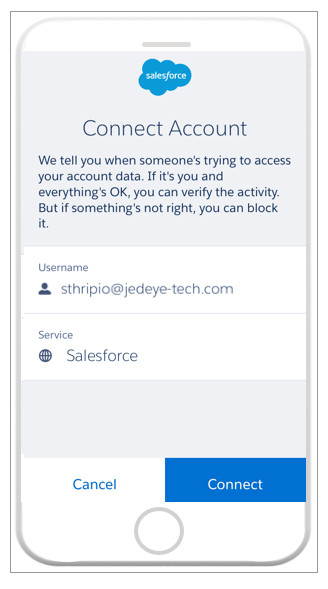
- PHONE: Tap Connect.
- DESKTOP: Sia is logged in to her Salesforce account! She can go about her business.
Now, whenever Sia logs in to her Salesforce account, she gets a notification on her phone. She opens Salesforce Authenticator and checks the activity details. If everything looks right, she taps Approve and finishes logging in.
What if someone else tries to log in with Sia’s username and password? You guessed it — she gets a notification about that too, and can tell Salesforce Authenticator to deny the login request. Phew!
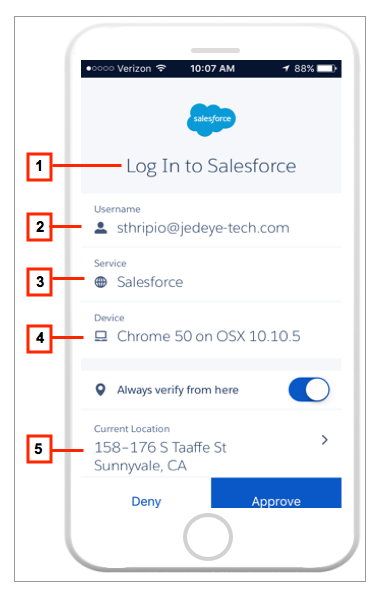
Let’s take a closer look at the data Salesforce Authenticator keeps track of.
- The action that Salesforce Authenticator is verifying. Other actions could show up here if you set up even tighter security. For example, you could require authentication when someone tries to access a record or dashboard. This process is called “step up” authentication.
- The user who’s trying to log in.
- The service the user is attempting to access. In addition to Salesforce, you can use Salesforce Authenticator with the LastPass password manager and other services that require stronger authentication.
- The device or browser from which the login attempt is taking place.
- Where the phone is located.
Automate the Authentication Process
Suppose Sia regularly logs in from the same place, such as the office, her home, or her favorite, dimly lit cantina. Tapping Approve on her phone could get old after a while. If she lets Salesforce Authenticator use her phone’s location services, she can tell the app to verify her activities automatically when she’s in a particular spot. In other words, if everything is normal, she doesn’t even have to pull her phone out of her pocket. Salesforce Authenticator can handle the MFA requirement for her automatically!
Let’s try it out.
- DESKTOP: Log out of Sia’s account and then log in as Sia again.
- PHONE: At the prompt, select Always approve from this location.
- DESKTOP: Log out of Sia’s account and log in again. Voila! You’re not prompted for a password. Salesforce Authenticator recognizes that Sia’s logging in to her Salesforce account again using the same device and at the same location. Access granted automatically!
Any time Sia tries to log in from a different location, she can add the location to the Salesforce Authenticator list of trusted locations. To view the list and other account details, Sia selects the information icon which opens the accounts details page.
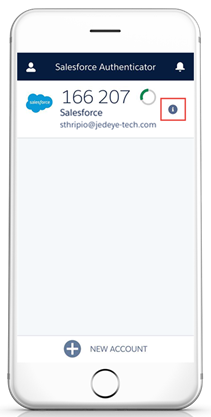
The account details page lists trusted locations and login activity history. Verified Activities shows how many times Salesforce Authenticator has verified Sia’s login to Salesforce. Automations shows how many times Salesforce Authenticator logged Sia in automatically from a trusted location.

What if Sia no longer trusts a location? Simple. She swipes left. She can clear all trusted locations at once by selecting ![]() and then Clear Trusted Locations.
and then Clear Trusted Locations.
Sometimes an automated verification may not work, like when the data connection drops off. Not a problem. Sia just types in the TOTP code that Salesforce Authenticator displays.
Want to restrict users’ automated verifications to trusted IP addresses only, such as your corporate network? Or prevent them entirely? You can. When logged in as an admin, go to your org’s Session Settings and change what’s allowed.

What Happens If Sia Loses Her Mobile Phone?
Good question. As you know, users crash or get marooned on desert planets and lose their phones. Happens all the time. If Sia loses her phone, gets a new one, or accidentally deletes Salesforce Authenticator, she has a few options. Sia can either restore her accounts from the backup she made earlier, or you can disconnect her account from Salesforce Authenticator and then she can re-register the app.
If Sia enabled account backups in her Salesforce Authenticator app, she’s in great shape. All she has to do is reinstall Salesforce Authenticator on her new phone. When she opens the app, she’ll see the option to restore her accounts from her backup. Sia enters the passcode she used when she backed up her accounts, and her accounts reappear on her phone.
What if Sia didn’t back up her accounts? Here’s what you can do to help.
- Log in as an administrator.
- From Setup, enter Users in the Quick Find box, then select Users.
- Click Sia’s name.
- On Sia’s user detail page, click Disconnect next to App Registration: Salesforce Authenticator.
The next time Sia logs in, if she doesn’t have another verification method connected, she’s prompted to connect Salesforce Authenticator again.

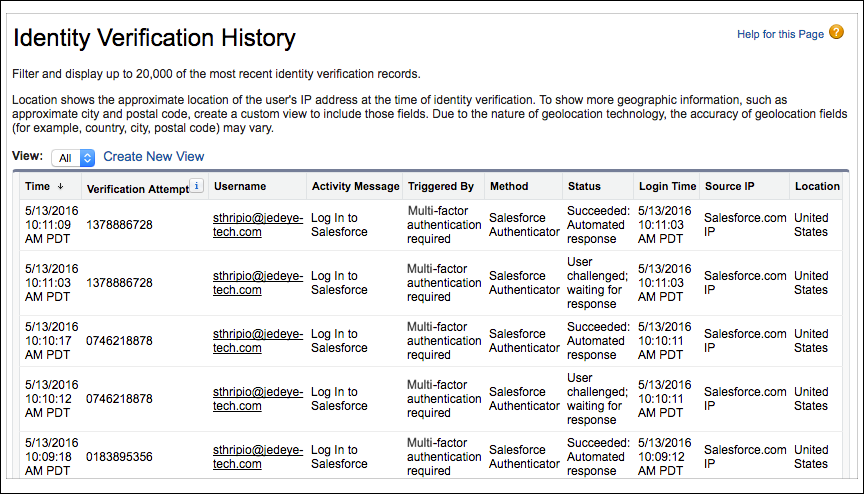
Monitor Who’s Logging In to Your Org
- Log in as the system administrator of your Trailhead Playground.
- From Setup, enter Verification in the Quick Find box, then select Identity Verification History.
Check out the Location column. It defaults to the user’s country, but you can get more detail by creating a custom view.
 Congratulations, administrator! You’ve seen how easy it is to turn on MFA for your users. We encourage you to explore other options for your MFA implementation, such as enabling U2F-compatible security keys as an alternative verification method. Security keys are a great option if users don’t have a mobile device or if cell phones aren’t allowed on the premises. Now let’s learn how to get even more control over your login process in the next unit, “Customizing Your Login Process with My Domain.”
Thanks designed for sharing such a pleasant thought, piece of writing is fastidious, thats why i have read it completely
Great article thank you for sharing!
Hello it’s me, I am also visiting this web page regularly, this website is genuinely pleasant
and the visitors are in fact sharing nice thoughts.
You actually make it appear so easy together with your
presentation however I to find this matter to be actually one
thing which I feel I’d never understand. It sort of feels too complex and very huge for
me. I’m having a look forward on your subsequent post, I will attempt to get the
hang of it!
I am sure this post has touched all the internet viewers,
its really really good paragraph on building up new webpage.
I will surely foreward this post to all of my pals! Its very excellent and a very fine read!